


Deploy a Serverless static website on AWS S3 and CloudFront using CloudFormation
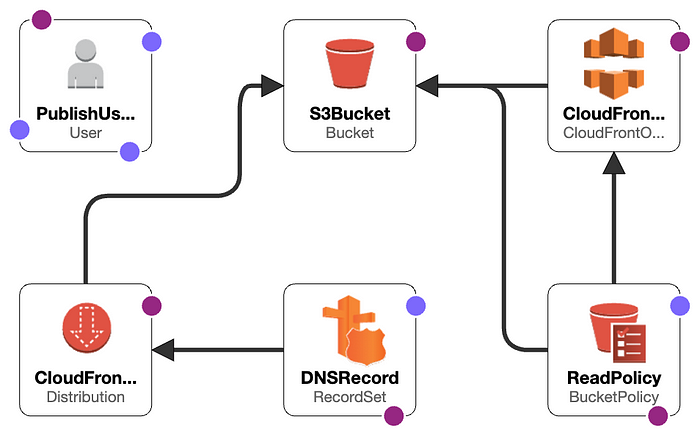
The design encompassing all the resources we’re about to generate is as follows:
In this blog post, we’ll delve into the following key topics:
- Discovering the streamlined deployment of AWS resources using AWS CloudFormation through a single command, complemented by the convenience of a Makefile.
- Finding a comprehensive reference to my GitHub repository, housing essential resources like the AWS CloudFormation template, a Makefile, and a starter static website template. This GitHub reference offers a valuable starting point for your resource deployment journey.
- Exploring a reference for manual resource creation using the AWS Management Console, catering to those who prefer a hands-on approach.
Note: All the resources that we are going to create will be almost free of cost provided that the visitor on the website will be low
Prerequisite:
- A route53 hosted zone. You can create one by going on AWS Route53 in AWS Management Console and selecting create hosted zone as shown in the screenshot below.

2. An SSL certificate. You can create one by going on AWS Certificate Manager(ACM) in AWS Management console and clicking the Request a certificate button as shown in the screenshot below.

How to use AWS CloudFormation to deploy AWS resources manually using AWS Management console?
Deploying AWS resources using AWS CloudFormation is a streamlined process that allows you to define and provision infrastructure as code. Here’s a concise guide on using AWS CloudFormation for resource deployment:
Create a Template: Craft a CloudFormation template in YAML or JSON, describing the desired resources, their properties, and relationships.
Stack Creation: In the AWS Management Console or through the AWS CLI, initiate the CloudFormation stack creation process. Provide the template, choose a stack name, and customize parameters.

If you are using s3 bucket provide the bucket URL in the Amazon S3 URL field. Otherwise, you can use Upload a template file option to directly upload template file.
Then in the upcoming steps you can fill in the necessary information and submit the form.
Note: In step 3 in the UI above there is the option to keep IAM role to control the access of the cloudformation stack that you are going to make. You can either create a role manually and assign the role name or role arn or keep it as blank.

Using CloudFormation simplifies resource provisioning, improves consistency, and enhances version control, making it a powerful tool in your AWS toolkit.
Deploy the resource for your static site using CLI:
Prerequisite: AWS CLI v2 installed.
AWSTemplateFormatVersion: 2010-09-09
Description: Static website hosting with S3 and CloudFront with a custom domain.
Parameters:
    Cert:
        Description: SSL Certificate ARN
        Type: String
    HostedZoneResourceID:
        Description: Hosted Zone ID
        Type: String
    DomainName:
        Description: Website Domain Name
        Type: String
    ErrorPagePath:
        Description: Directory error path
        Type: String
        Default: /error.html
    IndexDocument:
        Description: Directory index path
        Type: String
        Default: /index.html

Resources:
    S3Bucket:
        Type: "AWS::S3::Bucket"
        Properties:
            BucketName: !Sub ${DomainName}-cloudfront
    CloudFrontOriginAccessIdentity:
        Type: "AWS::CloudFront::CloudFrontOriginAccessIdentity"
        Properties:
            CloudFrontOriginAccessIdentityConfig:
                Comment: !Ref S3Bucket
    ReadPolicy:
        Type: "AWS::S3::BucketPolicy"
        Properties:
            Bucket: !Ref S3Bucket
            PolicyDocument:
                Statement:
                    - Action: "s3:GetObject"
                      Effect: Allow
                      Resource:
                          - !Sub "${S3Bucket.Arn}"
                          - !Sub "${S3Bucket.Arn}/*"
                      Principal:
                          CanonicalUser: !GetAtt CloudFrontOriginAccessIdentity.S3CanonicalUserId
    CloudFrontDistribution:
        Type: "AWS::CloudFront::Distribution"
        Properties:
            DistributionConfig:
                Aliases:
                    - !Ref DomainName
                ViewerCertificate:
                    AcmCertificateArn: !Ref Cert
                    SslSupportMethod: sni-only
                CustomErrorResponses:
                    - ErrorCode: 403
                      ResponseCode: 404
                      ResponsePagePath: !Ref ErrorPagePath
                DefaultCacheBehavior:
                    AllowedMethods:
                        - GET
                        - HEAD
                        - OPTIONS
                    CachedMethods:
                        - GET
                        - HEAD
                        - OPTIONS
                    Compress: true
                    DefaultTTL: 3600
                    ForwardedValues:
                        Cookies:
                            Forward: none
                        QueryString: false
                    MaxTTL: 86400
                    MinTTL: 60
                    TargetOriginId: s3origin
                    ViewerProtocolPolicy: redirect-to-https
                DefaultRootObject: "index.html"
                Enabled: true
                HttpVersion: http2
                Origins:
                    - DomainName: !GetAtt S3Bucket.DomainName
                      Id: s3origin
                      S3OriginConfig:
                          OriginAccessIdentity: !Sub >-
                              origin-access-identity/cloudfront/${CloudFrontOriginAccessIdentity}
                PriceClass: PriceClass_All
    PublishUser:
        Type: "AWS::IAM::User"
        Properties:
            Policies:
                - PolicyName: !Sub "publish-to-${S3Bucket}"
                  PolicyDocument:
                      Statement:
                          - Action: "s3:*"
                            Effect: Allow
                            Resource:
                                - !Sub "${S3Bucket.Arn}"
                                - !Sub "${S3Bucket.Arn}/*"
    DNSRecord:
        Type: AWS::Route53::RecordSet
        Properties:
            HostedZoneId: !Ref HostedZoneResourceID
            Comment: DNS name for cloud front
            Name: !Ref DomainName
            Type: A
            AliasTarget:
                HostedZoneId: Z2FDTNDATAQYW2
                DNSName: !GetAtt CloudFrontDistribution.DomainName
        DependsOn: CloudFrontDistribution

Outputs:
    BucketName:
        Description: S3 Bucket Name
        Value: !Ref S3Bucket
    PublishUser:
        Description: IAM User with write access to the bucket
        Value: !Ref PublishUser
    URL:
        Description: Website URL
        Value: !Ref DNSRecord
This CloudFormation YAML script sets up a secure static website using AWS resources. It creates an S3 bucket for website content, sets up CloudFront distribution with SSL, handles custom error pages, establishes IAM user permissions for publishing, and configures DNS records for a custom domain. The template ensures a streamlined deployment process for hosting a secure static website on AWS.
You can save this script in a file and name it as cloudformation.yaml and create the resource using the cli command:
aws cloudformation create-stack --region us-east-1 --stack-name $(STACK_NAME) --template-body $(STACK_BODY) --parameters ParameterKey=Cert,ParameterValue=$(CERT) ParameterKey=HostedZoneResourceID,ParameterValue=$(HostedZoneResourceID) ParameterKey=DomainName,ParameterValue=$(DomainName) --capabilities=CAPABILITY_NAMED_IAM --profile $(Profile)
Note: You have to replace the variables starting with $ sign in the above command as per the requirement


Be the first to leave a comment!