


Integrate AWS S3 with NestJS for private and public files storage
The goal of this article is to create a reusable DMS (Document Management System) service using NestJS and Amazon Simple Storage Service (S3) version3 SDK that should be able to:
- Store public and private files in a single S3 bucket.
- Generate pre-signed URLs for private files.
- Perform CRUD operations on S3 objects using NestJS.
Introduction
By default every object(file) uploaded in AWS S3 bucket is private. So only the owner of the object can access the object.
There might be case where you want to store both public and private files in single S3 bucket. For example, you want to store user’s profile picture as private and some static files like images, videos, etc. as public.
There are multiple ways to store the public and private files in AWS S3 bucket.
- Creating separate buckets for public and private files.
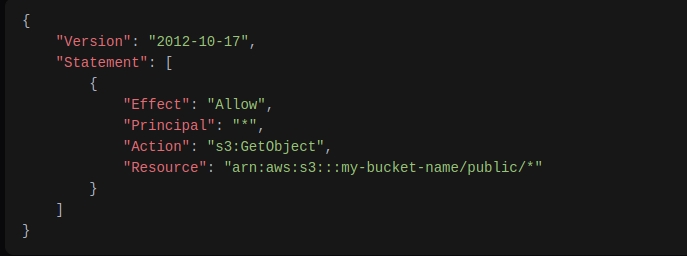
- Using different folders for public and private files in single bucket using bucket policies.
- Set the ACL (Access Control List) of the object to
public-readorprivatewhile uploading the object.
In this article we will explore the third option, i.e. storing both public and private files setting the ACL to each objects in single S3 bucket and generating pre-signed URLs for private files using NestJS and AWS SDK v3.
- For
publicfiles, we will set the ACL topublic-readwhile uploading the object. And once the server returns the URL of the object, the user can access the object using the URL. There won’t be any expiration time for the URL so no need to generate extra URL for public files. - If you are storing the
privatefiles in S3 bucket, you can generate a pre-signed URL for the object and provide it to the user. The user can access the object using the pre-signed URL for the limited time. After the expiration time, the URL will no longer be valid.
It might be useful when you want to :
- validate the user before providing access to the object.
- check the user’s subscription before providing access to the object.
- provide access to the object with specific access permissions, expiration times, and cryptographic signatures, ensuring that only authorized users can access the content.
Setup
AWS S3 Bucket Configuration
- Create a new S3 bucket in AWS console
Initially the creation page will look like this:
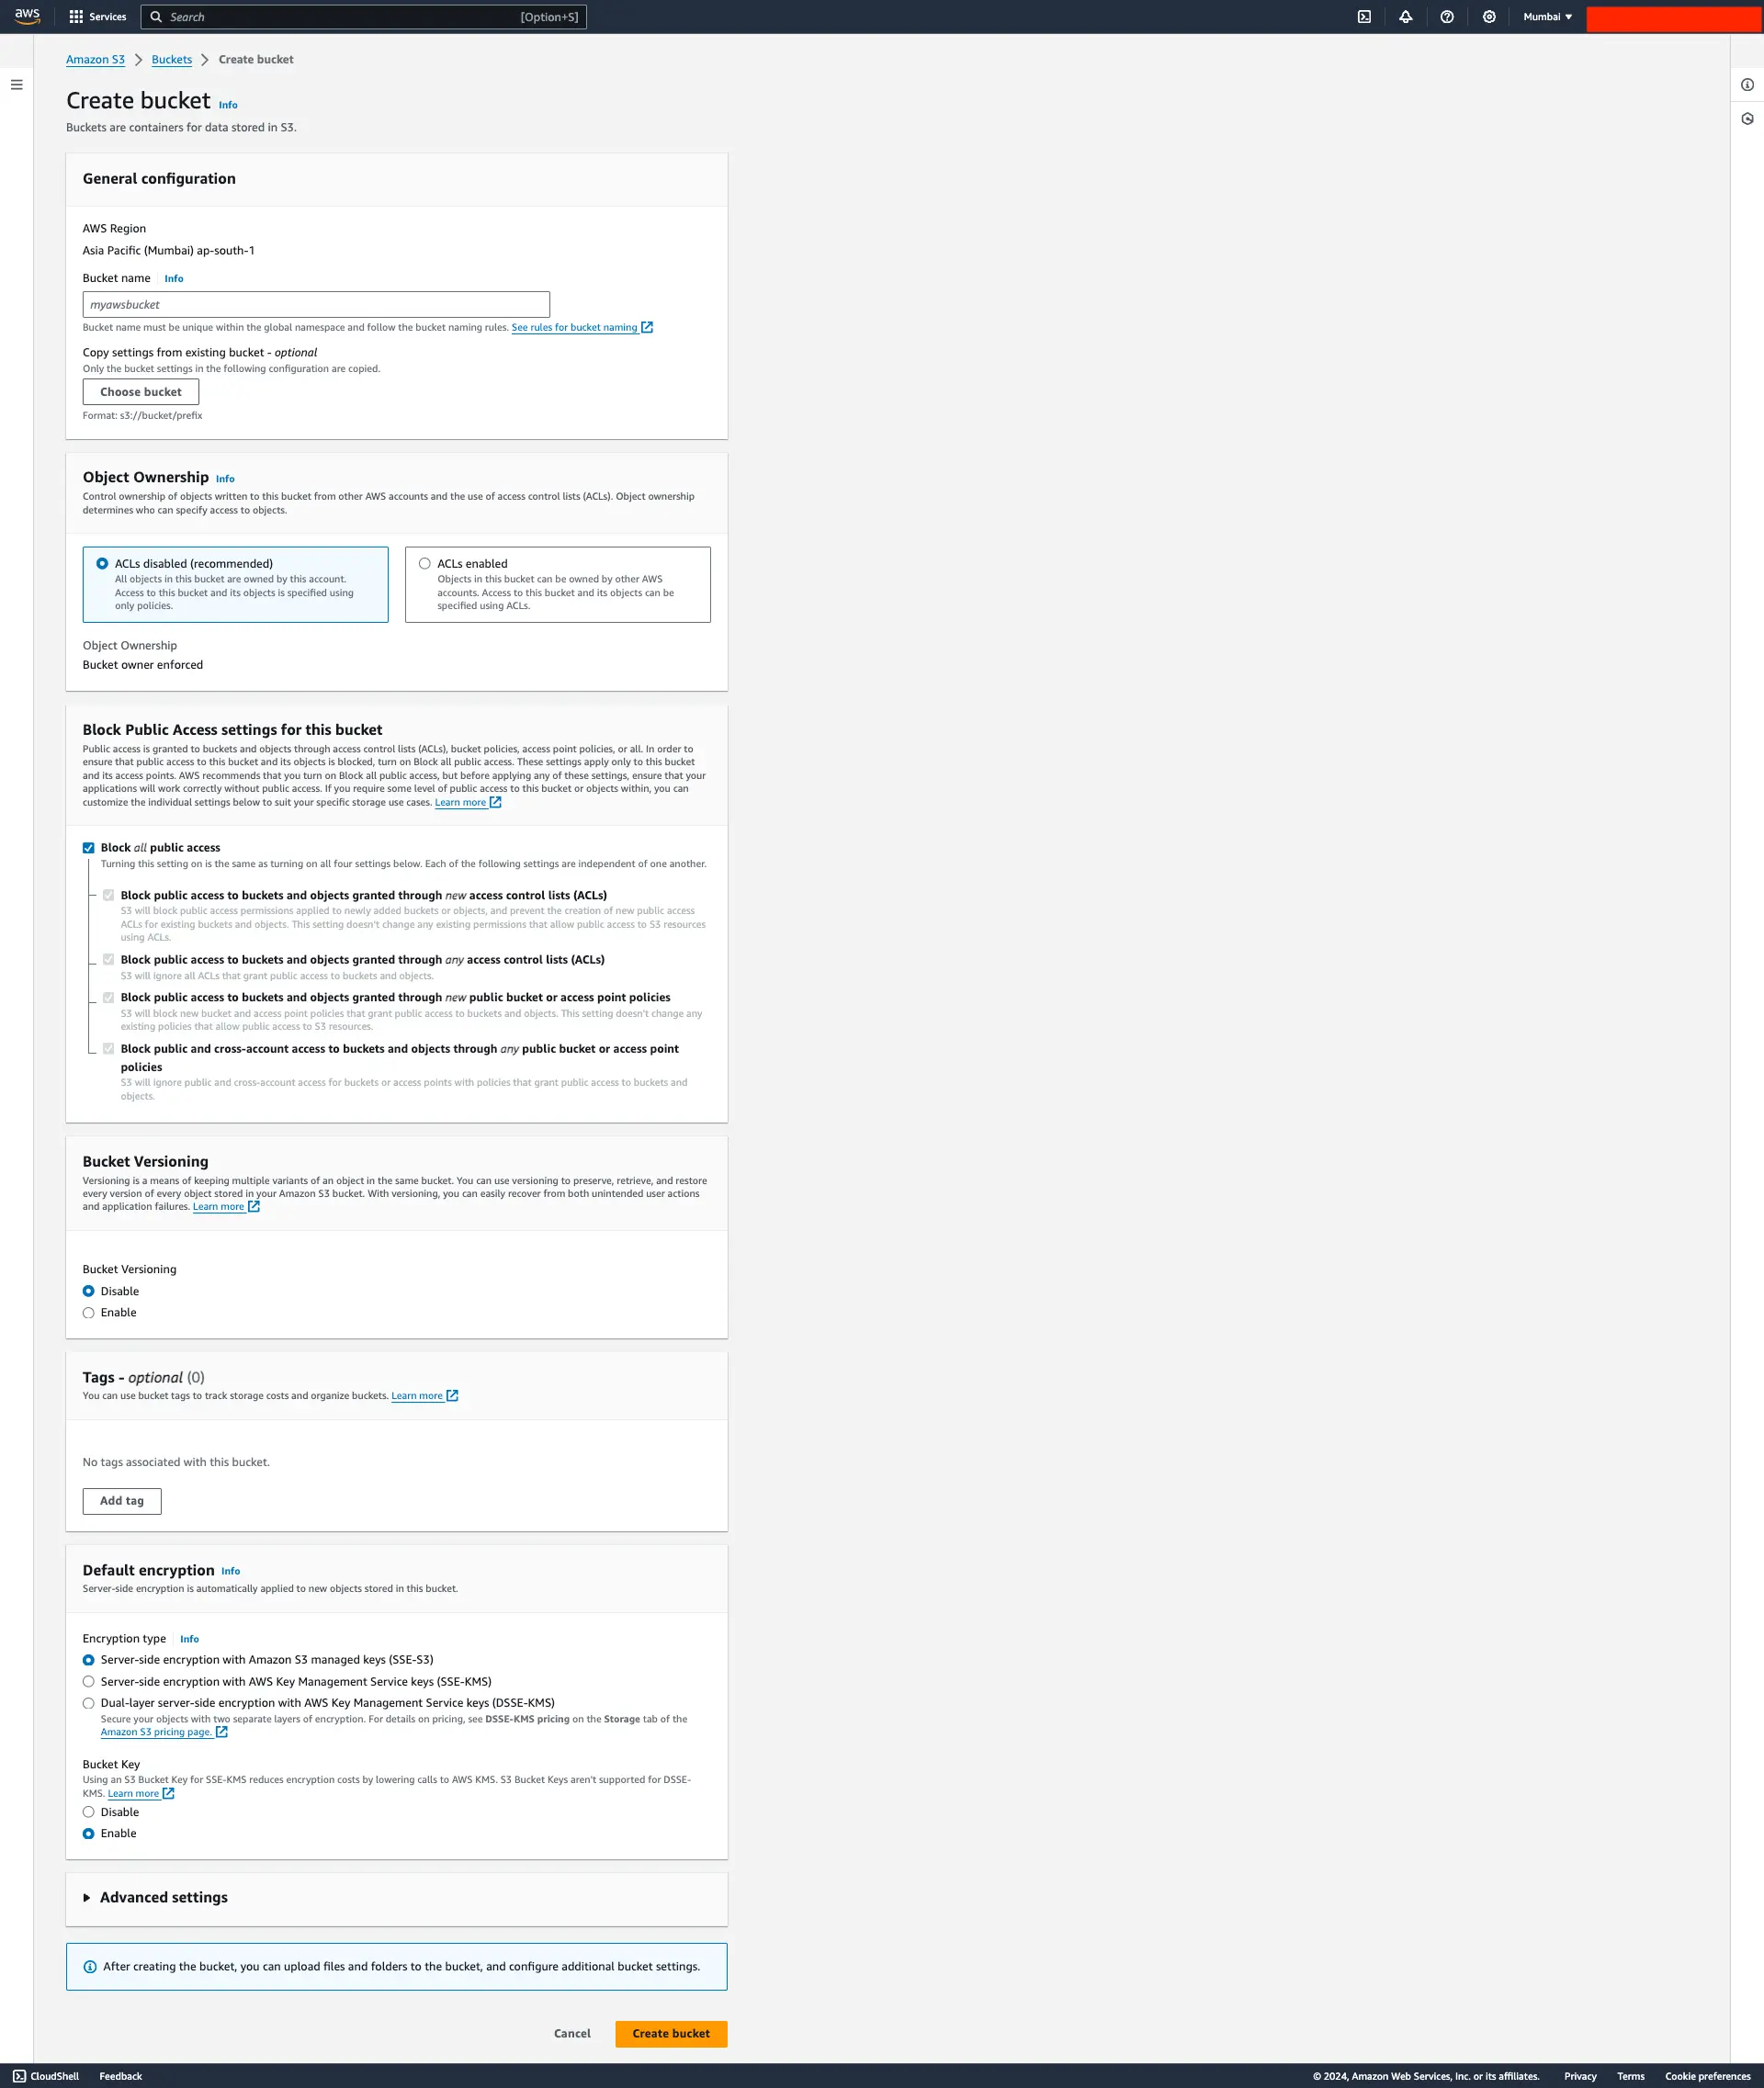
Three things to note while creating the bucket:
- Fillout the bucket name
- change ownership to ACLs enabled
- uncheck the block all public access.
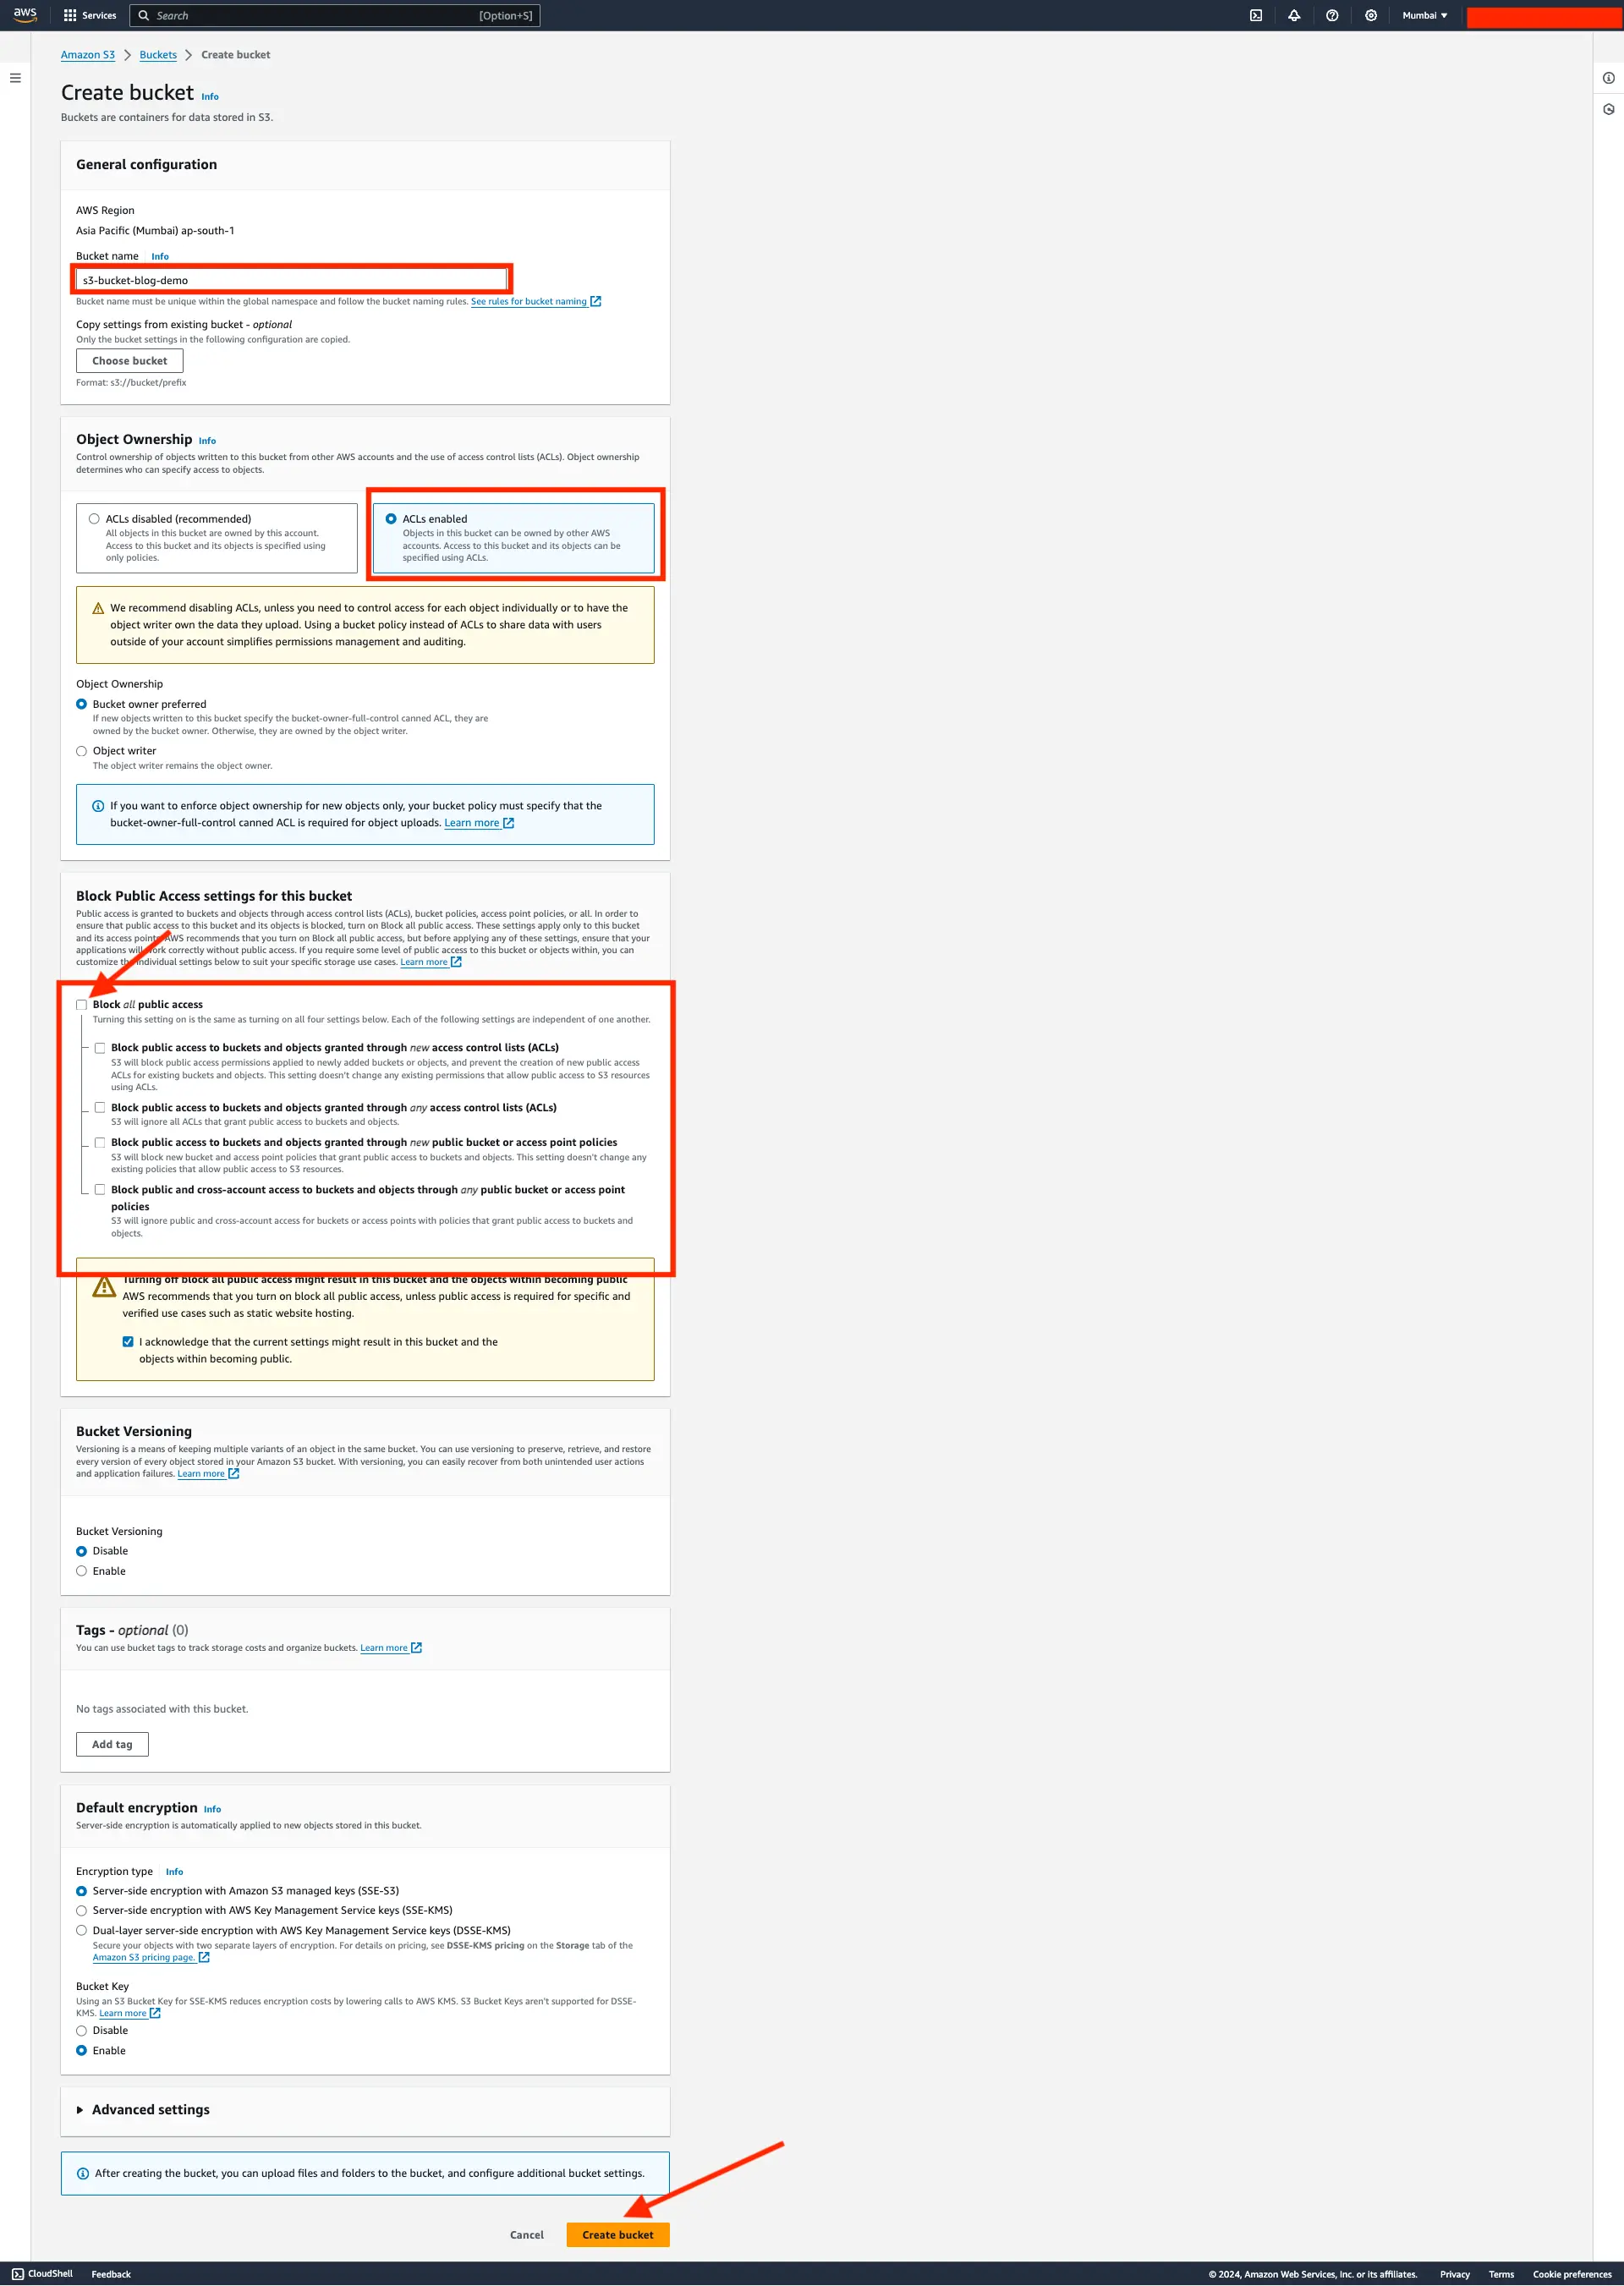
Now our AWS S3 bucket is ready to store the objects.
Note down the Access Key ID, Secret Access Key, Region, Bucket Name credentials from the AWS console which will be used in the NestJS application to access the S3 bucket.
NestJS Application Setup
In your NestJS application, install the @aws-sdk/client-s3 and @aws-sdk/s3-request-presigner.
npm install @aws-sdk/client-s3 @aws-sdk/s3-request-presigner uuidnpm install -D @types/multerAlso uuid package is used to generate the unique key for the object whereas @types/multer is used to provide the types for the File object.
Create a new module called dms which will be handling the document management system operations.
npx nest g module dms
npx nest g service dms
npx nest g controller dms
Also don’t forgot to add the AWS S3 credentials in the .env file.
S3_ACCESS_KEY= # Access Key ID
S3_SECRET_ACCESS_KEY= # Secret Access Key
S3_REGION="ap-south-1"  # Region (this might be different for you)
S3_BUCKET_NAME="s3-bucket-blog-demo" # Bucket Name (this might be different for you)
I’ve breakdonw the implementation into multiple steps, at the end of the article you can find the complete implementation of the DMS service.
Initialize the S3 client
At first we need to initialize the S3 client with the AWS credentials.
dms/dms.service.ts
import { Injectable, InternalServerErrorException } from ‘@nestjs/common’;
import { ConfigService } from ‘@nestjs/config’;
import {
S3Client,
PutObjectCommand,
DeleteObjectCommand,
GetObjectCommand,
} from ‘@aws-sdk/client-s3’;
import { v4 as uuidv4 } from ‘uuid’;
@Injectable()
export class DmsService {
privateclient:S3Client;
privatebucketName=this.configService.get(‘S3_BUCKET_NAME’);
constructor(
privatereadonlyconfigService:ConfigService,
) {
consts3_region=this.configService.get(‘S3_REGION’);
if (!s3_region) {
thrownewError(‘S3_REGION not found in environment variables’);
}
this.client=newS3Client({
region:s3_region,
credentials: {
accessKeyId:this.configService.get(‘S3_ACCESS_KEY’),
secretAccessKey:this.configService.get(‘S3_SECRET_ACCESS_KEY’),
},
forcePathStyle:true,
});
}
}
In the above code, we have initialized the S3 client with the AWS credentials and region. The same client instance will be used throughout the application to perform the S3 operations.
Upload the object to S3 bucket
To upload the object to S3 bucket, we need to use the PutObjectCommand command from the @aws-sdk/client-s3 package and create another method uploadSingleFile in the same DmsService class.
import { PutObjectCommand } from ‘@aws-sdk/client-s3’;
// methods inside DmsService class
asyncuploadSingleFile({
file,
isPublic=true,
}: {
file:Express.Multer.File;
isPublic: boolean;
}) {
try {
constkey=`${uuidv4()}`;
constcommand=newPutObjectCommand({
Bucket:this.bucketName,
Key:key,
Body:file.buffer,
ContentType:file.mimetype,
ACL:isPublic?’public-read’:’private’,
Metadata: {
originalName:file.originalname,
},
});
constuploadResult=awaitthis.client.send(command);
return {
url:isPublic
? (awaitthis.getFileUrl(key)).url
: (awaitthis.getPresignedSignedUrl(key)).url,
key,
isPublic,
};
} catch (error) {
thrownewInternalServerErrorException(error);
}
}
asyncgetFileUrl(key: string) {
return { url:`https://${this.bucketName}.s3.amazonaws.com/${key}` };
}
asyncgetPresignedSignedUrl(key: string) {
try {
constcommand=newGetObjectCommand({
Bucket:this.bucketName,
Key:key,
});
consturl=awaitgetSignedUrl(this.client, command, {
expiresIn:60*60*24, // 24 hours
});
return { url };
} catch (error) {
thrownewInternalServerErrorException(error);
}
}
// …other code
In the above code, we have created a new method uploadSingleFile which takes the file and isPublic flag as input.
The PutObjectCommand command is used to upload the object to the S3 bucket taking the different inputs like Bucket, Key, Body, ContentType, ACL, Metadata. The Key is generated using the uuidv4 method which will be unique for each object, so that we can use it to access the object later.
- If the file is public, we set the ACL to
public-readand return the URL of the file using thegetFileUrlmethod. - If the file is private, we set the ACL to
privateand generate the pre-signed URL for the file and return the URL using thegetPresignedSignedUrlmethod.
Since the signed URL is valid for the limited time, we have set the expiration time to 24 hours (60 * 60 * 24 seconds).
💡The only way to access the private or public object is using the
key of object. Most of the times the key of object is stored in the database along side the other properties of entity. Frontend can call the API to get the URL of the object using the key of the object.In the similar way we can create the methods to delete the object in the DmsService class.
dms/dms.service.ts
async deleteFile(key: string) {
try {
constcommand=newDeleteObjectCommand({
Bucket:this.bucketName,
Key:key,
});
awaitthis.client.send(command);
return { message:’File deleted successfully’ };
} catch (error) {
thrownewInternalServerErrorException(error);
}
}
Here’s how the final code for the DmsService looks like:
dms/dms.service.ts
import { Injectable, InternalServerErrorException } from ‘@nestjs/common’;
import { ConfigService } from ‘@nestjs/config’;
import {
S3Client,
PutObjectCommand,
DeleteObjectCommand,
GetObjectCommand,
} from ‘@aws-sdk/client-s3’;
import { getSignedUrl } from ‘@aws-sdk/s3-request-presigner’;
import { v4 as uuidv4 } from ‘uuid’;
@Injectable()
export class DmsService {
privateclient:S3Client;
privatebucketName=this.configService.get(‘S3_BUCKET_NAME’);
constructor(
privatereadonlyconfigService:ConfigService,
) {
consts3_region=this.configService.get(‘S3_REGION’);
if (!s3_region) {
this.logger.warn(‘S3_REGION not found in environment variables’);
thrownewError(‘S3_REGION not found in environment variables’);
}
this.client=newS3Client({
region:s3_region,
credentials: {
accessKeyId:this.configService.get(‘S3_ACCESS_KEY’),
secretAccessKey:this.configService.get(‘S3_SECRET_ACCESS_KEY’),
},
forcePathStyle:true,
});
}
asyncuploadSingleFile({
file,
isPublic=true,
}: {
file:Express.Multer.File;
isPublic:boolean;
}) {
try {
constkey=`${uuidv4()}`;
constcommand=newPutObjectCommand({
Bucket:this.bucketName,
Key:key,
Body:file.buffer,
ContentType:file.mimetype,
ACL:isPublic?’public-read’:’private’,
Metadata: {
originalName:file.originalname,
},
});
constuploadResult=awaitthis.client.send(command);
return {
url:isPublic
? (awaitthis.getFileUrl(key)).url
: (awaitthis.getPresignedSignedUrl(key)).url,
key,
isPublic,
};
} catch (error) {
thrownewInternalServerErrorException(error);
}
}
asyncgetFileUrl(key:string) {
return { url:`https://${this.bucketName}.s3.amazonaws.com/${key}` };
}
}
Controller Implementation
In the dms.controller.ts file, we can create the different routes to upload, access public and private object and delete the object and get the URL of the object.
dms/dms.controller.ts
import {
Body,
Controller,
FileTypeValidator,
Get,
HttpCode,
HttpStatus,
MaxFileSizeValidator,
Param,
ParseFilePipe,
Post,
UploadedFile,
UploadedFiles,
UseGuards,
UseInterceptors,
} from ‘@nestjs/common’;
import { FileInterceptor } from ‘@nestjs/platform-express’;
import { DmsService } from ‘./dms.service’;
@Controller(‘dms’)
export class DmsController {
constructor(privatereadonlydmsService:DmsService) { }
@Post(‘/file’)
@UseInterceptors(FileInterceptor(‘file’))
asyncuploadFile(
@UploadedFile(
newParseFilePipe({
validators: [
newFileTypeValidator({ fileType:’.(png|jpeg|jpg)’ }),
newMaxFileSizeValidator({
maxSize:MAX_FILE_SIZE, // 10MB
message:’File is too large. Max file size is 10MB’,
}),
],
fileIsRequired:true,
}),
)
file:Express.Multer.File,
@Body(‘isPublic’) isPublic: string,
) {
constisPublicBool=isPublic===’true’?true:false;
returnthis.dmsService.uploadSingleFile({ file, isPublic:isPublicBool });
}
@Get(‘:key’)
asyncgetFileUrl(@Param(‘key’) key:string) {
returnthis.dmsService.getFileUrl(key);
}
@Get(‘/signed-url/:key’)
asyncgetSingedUrl(@Param(‘key’) key:string) {
returnthis.dmsService.getPresignedSignedUrl(key);
}
@Delete(‘:key’)
asyncdeleteFile(@Param(‘key’) key:string) {
returnthis.dmsService.deleteFile(key);
}
}
In the above code, we have created the different routes to upload the file, get the URL of the file, get the pre-signed URL of the file and delete the file. Also we have added bit of validation for the file type and file size using the FileTypeValidator and MaxFileSizeValidator classes to validate the file type and file size respectively.
Testing the API via Postman
To test the API, we can use the Postman to upload the file, get the public URL of the file and get the pre-signed URL of the file. Refer the below screenshots to test the API using Postman.
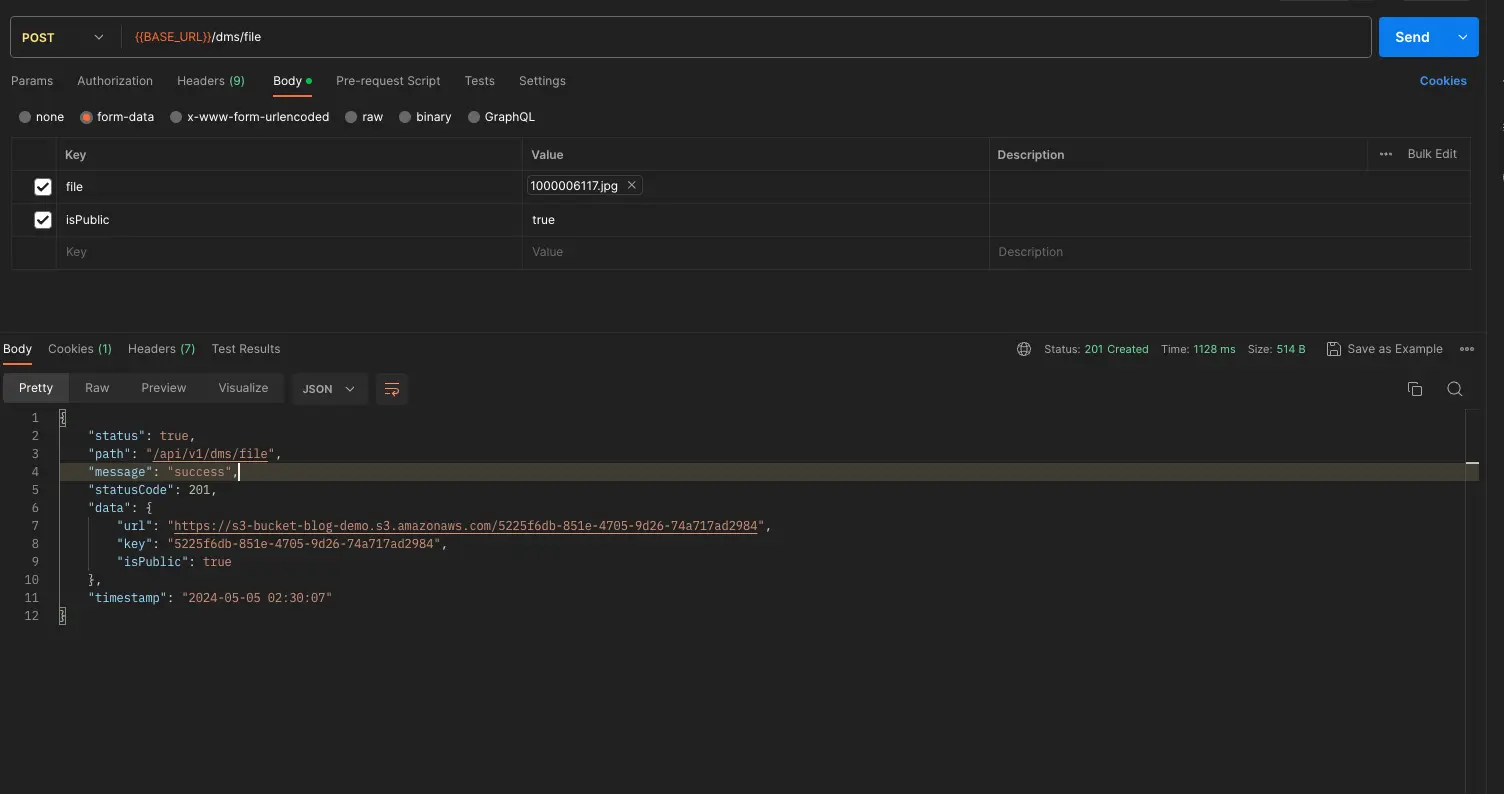
- Upload the public file to S3 bucket
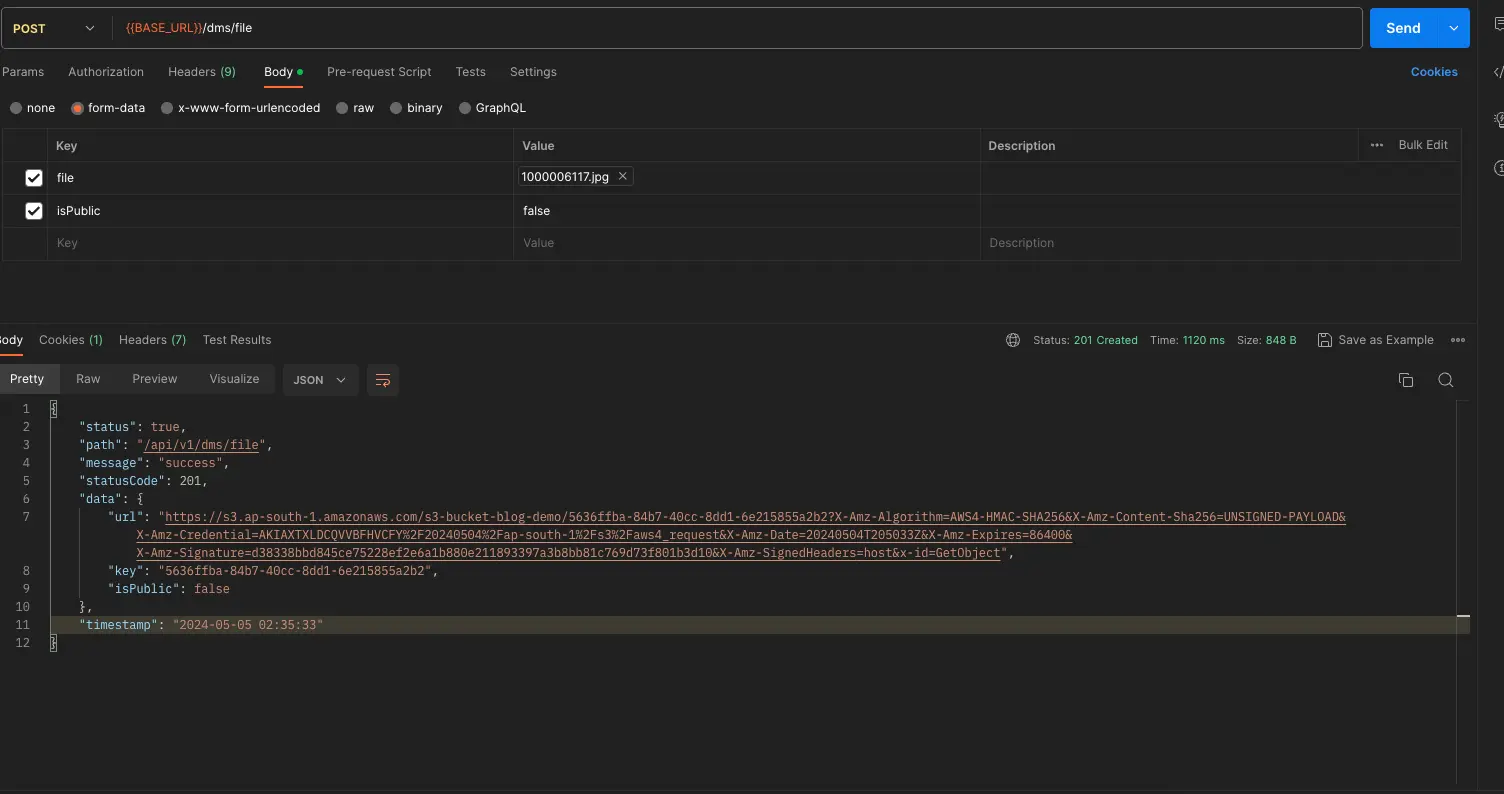
- Upload the private file to S3 bucket
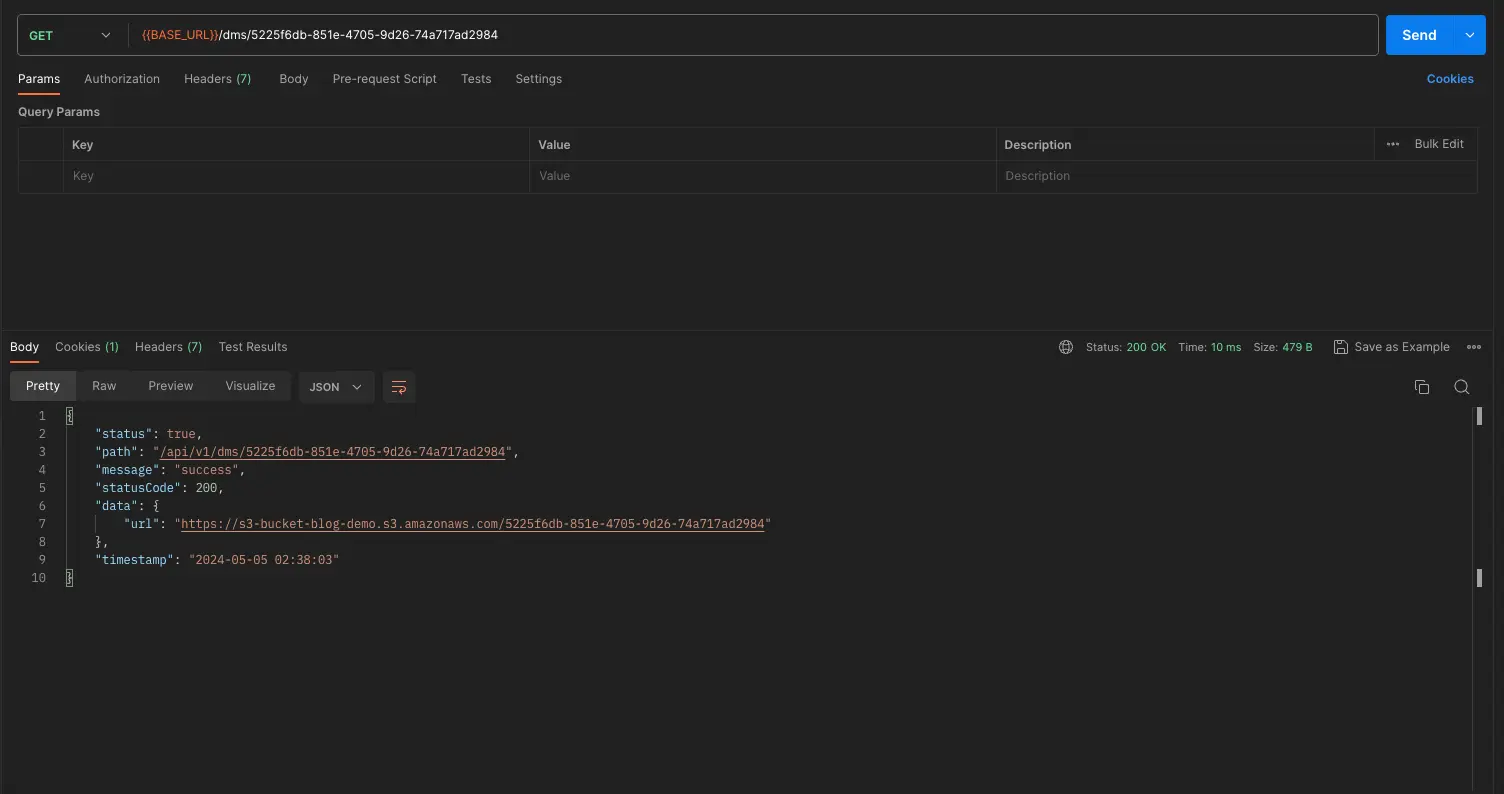
- Get the public URL of the file
- Get the pre-signed URL of the private file
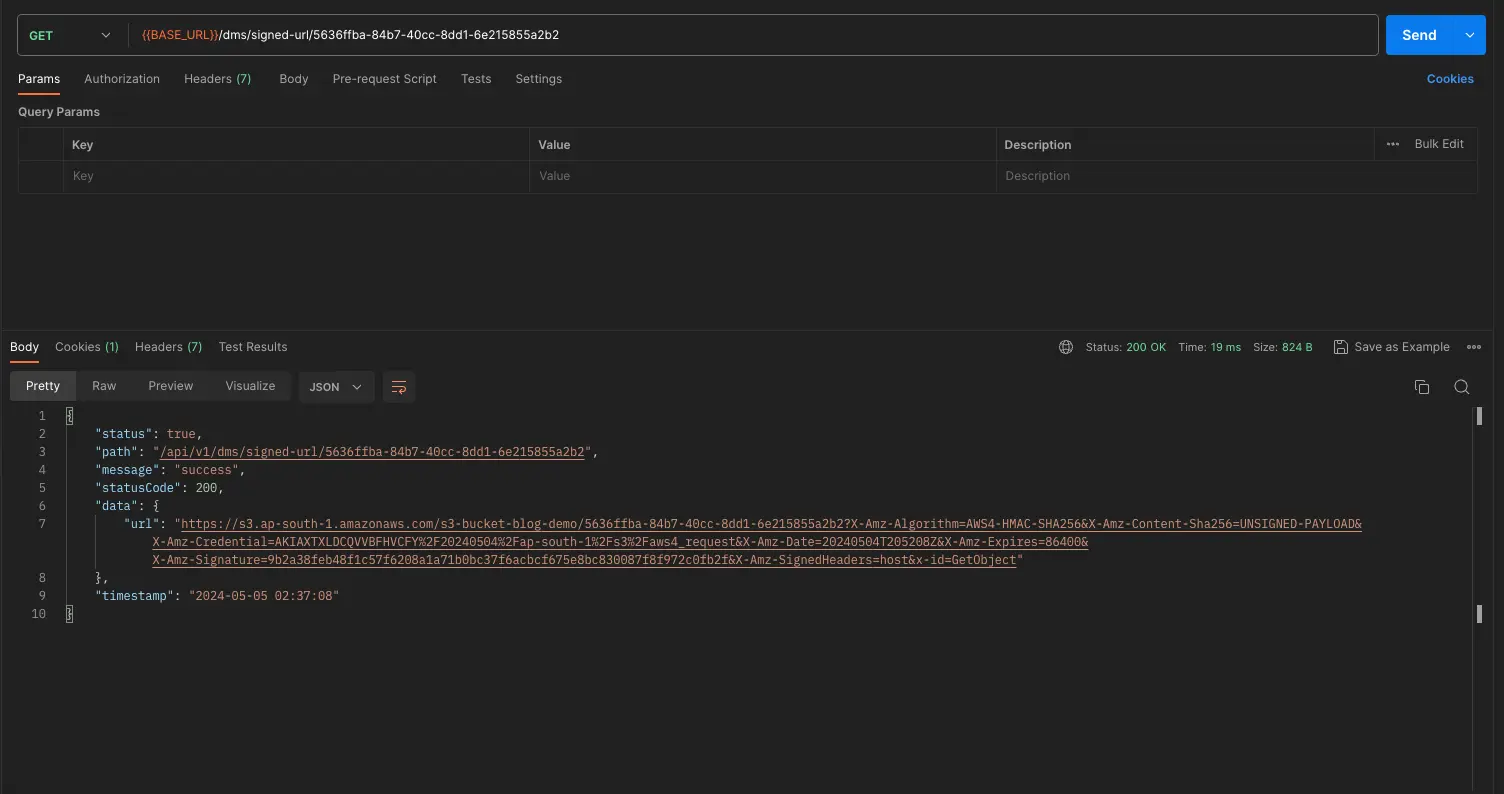
You might see a different response format in the Postman as compared to the screenshot above, as I’ve formatted the response.


Be the first to leave a comment!